Discover the varieties of Mangetout (Pisum sativum var. saccharatum), how to care for them, overwintering tips, and the most common pests!

Growing Mangetout: varieties, planting, pruning and diseases||||||
When I first planted Mangetout (Pisum sativum var. saccharatum), I eagerly awaited its flowering. My garden was full of life, and when the pea pods appeared, their flavour was so sweet that I had to eat them immediately! Since then, I plant it every spring because it’s not only delicious but the children also love picking fresh peas straight from the garden.
Mangetout is a special variety of the garden pea (Pisum sativum) (convar. saccharatum), whose seeds are sweet and whose tender pods are also edible. The pods are broader and flatter, and at harvest time they have not yet developed the papery, fibrous layer that hardens later in shelling peas.
Thanks to this, Mangetout can be enjoyed whole with the pod, and its crisp, sweet flavour makes it a real treat in the kitchen. Below, we’ll review the essentials of successfully growing Mangetout—from soil preparation and sowing to care tips and harvesting—complemented with personal experiences and tried-and-true practices to ensure a bountiful crop.
Soil Requirements: Mangetout is relatively easy to grow and develops satisfactorily in most garden soils. It prefers well-draining, medium-textured loamy soils rich in humus. Slightly calcareous, neutral to mildly alkaline soils are ideal for it.
Extremely heavy clay or very sandy, nutrient-poor soils should be improved before planting—heavy soils can be loosened with sand, compost, or shredded mulch, while sandy soils benefit from compost or well-rotted manure to improve moisture and nutrient retention. Although Mangetout belongs to the legume family and its roots host nitrogen-fixing bacteria that enrich the soil, this nutrient release mainly benefits the following crop.
Therefore, despite its own nitrogen supply, Mangetout appreciates good nutrient management: incorporate compost or, if necessary, a balanced NPK fertiliser in moderate amounts in autumn or early spring. Avoid fresh manure applied directly, as it may cause excessive leaf growth and poorer pod formation.
Mangetout especially needs phosphorus and potassium—they support root development and flowering—while it grows well without excessive nitrogen fertilisation. Thus, a well-structured, moderately fertile soil provides the best start for the plant.
You can sow it as early as late February to early March, as soon as the soil thaws and is workable. The seeds germinate at soil temperatures around 5 °C, and young plants can survive mild ground frosts (-2…-5 °C) without damage.
Delaying sowing is not advisable because Mangetout prefers cool, longer spring days: if sown too late (towards summer heat and longer daylight), the plant flowers before finishing leaf growth, resulting in poor, reduced yields.
Therefore, in the UK, sowing in March is generally ideal; sowing later than mid-April is risky, and autumn sowing or overwintering varieties might be better alternatives.
The advantage of early sowing is that harvesting can take place from late May to June, allowing you to plant a second crop in the same space for the rest of the season.
Prepare the soil well by digging, loosening, and removing weeds, then draw furrows 3-5 cm deep. Sow seeds about 5-6 cm deep—shallower (5 cm) in heavier soils and deeper (up to 7-8 cm) in loose sandy soils. Seeds can be sown in rows, spaced about 5-8 cm apart, or in small clusters (“nests”) of 2-3 seeds, with nests spaced 15-20 cm apart.
The row spacing is typically 25-30 cm to prevent shading and ensure good air circulation among the dense foliage. Before sowing, it’s beneficial to water the soil or soak the seeds for a few hours to encourage quick and even germination.
After sowing, rake the soil back lightly and gently firm it to ensure good seed-to-soil contact, then water the sowing area lightly again.
Tip: For continuous supply, consider succession sowing: sow new rows every 2-3 weeks to extend the harvesting season, so when the first sowings finish, later ones are still producing.
Tall varieties require support to keep their long stems off the ground. Install simple supports at sowing time or shortly after: for example, place stakes or branches 1-1.5 m high along the rows and string strong twine horizontally at several levels, or use plastic/hemp netting or metal fencing to train the peas.
Young plants’ tendrils quickly coil around the supports. Shorter bushy varieties (<60 cm) can support each other when grown densely in rows, but a low (30-50 cm) net still helps with harvesting and improves airflow. Without support, trailing stems are more prone to disease and pods can become dirty or rot, so it’s worth paying attention to this.
Light and Temperature: Mangetout is a light-loving plant that thrives in sunny, bright locations. It can tolerate partial shade but will flower less and produce more leggy growth. It prefers cool early spring weather, with an optimal growing temperature of around 16–19 °C. It does not tolerate prolonged heat above 25 °C well: although foliage may be lush, fewer pods set, and existing pods may be small or mature prematurely (become tough). 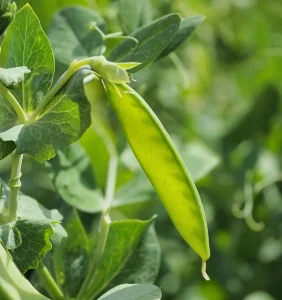
Therefore, choosing the right sowing time and shading and watering the soil during hot spells (see below) to keep roots cool is important.
In wet springs, it can almost grow without additional watering, but for even growth and abundant yield, monitor moisture carefully. At germination and early growth, the soil should not dry out; if rainfall is insufficient, keep the soil moderately moist, especially to ensure uniform germination.
Established plants tolerate short dry spells well due to their deep roots, which can access moisture, but they also dry out the soil around them.
In dry springs, supplemental watering may be necessary, especially during flowering and pod setting. If leaves wilt or soil becomes too dry, water to support pod formation and ensure a rich harvest.
Water preferably early in the morning so foliage dries quickly during the day (preventing fungal diseases). Avoid overwatering and waterlogging as Mangetout roots dislike saturated soil—always ensure the surface dries out between waterings.
Mulching (e.g., with a thin layer of straw or grass clippings) helps prevent rapid soil drying and moderates temperature fluctuations, but keep mulch away from direct contact with stems and watch for slugs hiding underneath.
If the soil is well prepared and enriched with compost before sowing, additional feeding during growth is usually only needed if deficiencies appear. Generally, Mangetout does not require extra fertilisation during the growing season, especially in fertile soils. Avoid excessive nitrogen fertiliser, as the plant “feeds itself” through nitrogen-fixing bacteria in root nodules.
The plant uses some nitrogen and leaves the rest to enrich the soil for the next crop. If you notice weak, yellowing shoots or have very poor soil, shallowly incorporate some organic fertiliser (e.g., composted cow manure) or organic liquid fertiliser (e.g., nettle tea, worm humus solution) before flowering.
Alternatively, small amounts of phosphorus- and potassium-rich fertilisers can be applied.
Ensure fertiliser granules do not contact stems or leaves directly (to avoid burning), and always water in after application.
Mangetout has shallow roots, so hoe carefully to avoid damage. Regular weeding and soil loosening is important to prevent weeds from competing for moisture and nutrients and to avoid soil crusting and compaction after watering. 
Light hoeing or raking between rows keeps the soil surface loose and ensures oxygen supply to roots.
Excellent companions include leafy greens like lettuce and spinach, which are low-growing and harvested early—by the time Mangetout grows tall, the salad is already harvested, so they don’t compete.
Among aromatic herbs, mint and coriander are good neighbours; their scents can deter some pests. Root vegetables like carrots and radishes also pair well, as do cucurbits and potatoes such as cucumber, courgette, potato, or tomato.
Brassicas (broccoli, cauliflower, Brussels sprouts) have a particularly positive effect on Mangetout and vice versa—the peas enrich the soil for them, and they shade the soil around the pea plants. However, watch out for bad companions: Mangetout does not tolerate close proximity to alliums, so avoid planting onions, garlic, or leeks directly beside pea rows. Also avoid pairing peas with sage, as they can inhibit each other’s growth.
Regarding crop rotation, Mangetout is an excellent predecessor: the nitrogen left in the soil and loosened soil structure benefit almost any following crop, especially nutrient-demanding vegetables or brassicas. However, only plant peas or other legumes in the same spot again after 4-5 years to prevent soil-borne pests and diseases from building up.
Mangetout grows quickly and remains healthy under suitable conditions, but like all crops, it has characteristic pests and diseases. Prevention is key: follow crop rotation, companion planting advice, and maintain good plant health with balanced nutrients and water.
Avoid overly dense planting as poor ventilation favours fungal diseases—thin out, tie up, or prune overcrowded areas if needed. Among pests, the green pea aphid (Acyrthosiphon pisum) is significant, colonising shoot tips and leaf undersides.
Their feeding weakens plants, distorts new shoots, flowers, and in severe infestations, pods may deform or drop. Aphids also transmit viruses (e.g., mosaic viruses), so even small numbers can spread infection. Control by spraying colonies with mild soapy water or nettle decoction, or use organic insecticides (e.g., neem oil) early on.
Encourage natural aphid predators like ladybirds and hoverfly larvae in your garden to keep populations in check. Another common pest is the pea weevil or pea seed beetle (Bruchus pisorum), a small beetle that lays eggs inside peas. Larvae tunnel into pods and consume the seeds, leaving holes and wormy peas. Prevention through crop rotation and careful removal of infected pods is the best defence.
Caterpillars of moths (e.g., the acacia moth) also chew pods, indicated by small entry holes and feeding marks. Remove and destroy affected pods immediately.
Soil-dwelling pests, such as cutworms (various moth larvae), can damage roots and stems near the soil surface—control by soil cultivation, cleanliness, and, if necessary, soil disinfection.
In wet springs, slugs and snails can also damage young shoots and leaves; control with beer traps, handpicking, or organic slug repellents.
Infected parts show stunted growth and may die back in severe cases. Prevention includes ensuring good airflow and avoiding excessive nitrogen; established infections can be managed with sulphur fungicides or homemade baking soda sprays.
Downy mildew (pea downy mildew) appears in cooler, wet weather: yellow-green spots on leaf surfaces and grey-purple mould underneath. Prevention involves crop rotation, resistant varieties, and copper-based sprays if necessary.
Two important soil-borne diseases to watch for are root and basal stem rot caused by Fusarium fungi and various bacterial wilts.
These cause yellowing, wilting, and often leaf spotting. If plants suddenly wilt without obvious cause, pull them out; if roots are brown and rotting, infection is present—remove and destroy affected plants. Soil disinfection is impractical in home gardens, so avoid planting legumes in the same spot for several years.
Also worth mentioning is pea rust, which forms orange-brown pustules on leaves late in summer but rarely causes serious problems. Viral diseases (e.g., pea mosaic virus) are best prevented by using virus-free seed, controlling aphids, and removing symptomatic plants.
With attentive care, Mangetout’s diseases and pests can be managed effectively. At the end of the season, always harvest all plants thoroughly (don’t leave yellowed stems, pods, or root debris) and cultivate the soil.
This reduces overwintering pests and creates a healthier foundation for the next year’s crop.
Over several years of growing Mangetout in my small garden, I’ve learned what helps improve yields. Here are some proven tips and personal experiences:
Pre-soaking seeds: I’ve noticed soaking seeds significantly speeds up germination. I usually soak Mangetout seeds overnight in lukewarm water (or chamomile tea) before sowing. The swollen seeds sprout a few days earlier than dry ones, resulting in a more uniform stand. Just ensure the soil isn’t bone dry when sowing soaked seeds to prevent seedlings drying out.
Staggered sowing: To extend the harvest, I don’t sow all at once but in two or three batches. The first batch goes in early March, the next about two weeks later. This way, the second batch starts producing as the first finishes. This trick extends the fresh Mangetout season by about a month. (I don’t sow beyond mid-summer due to weather; my longest harvest runs from late May to early July.)
Thinning and pruning: If peas germinate too densely, I thin the rows to prevent overcrowding. I remove the weakest shoots at ground level, leaving about 8-10 cm between plants. This helps prevent fungal diseases. Also, when plants reach the top of the support, I pinch the tips. This encourages side shoots and directs energy into pod development instead of further elongation, making the crop bushier and easier to harvest.
Timely support installation: It’s important to have the trellis or stakes in place when plants are 5-10 cm tall. One year I delayed this and found it very difficult to install supports without breaking tangled stems. Early installation allows peas to climb naturally and prevents sprawling. I also train plants on both sides of the row for better wind resistance.
Mulching and soil moisture: In dry springs, mulching helps a lot. When seedlings reach about 15 cm, I cover the rows with a thin mulch layer (e.g., straw). This retains moisture and keeps roots cool during heatwaves. I ensure mulch doesn’t touch stems and place slug baits nearby, as damp mulch can attract slugs.
Regular harvesting: The most important tip: harvest pods continuously! I walk the rows daily to pick ripe pods, encouraging the plant to flower more and keep producing. Leaving many mature pods causes the plant to stop flowering. I pick pods young, before seeds bulge, for the sweetest, crispiest flavour. Harvest by gently snapping pods off the stalk with two fingers, being careful not to break the thin stems.
Seed saving: I always leave a few pods to fully mature on the plant at season’s end. I harvest these only when dry and extract the seeds, storing them in a cool, dry place for next year’s sowing. It’s important to collect seeds only from healthy plants and remove plant debris after harvest to prevent pests.
Mangetout is a relatively short-season crop; depending on variety and weather, harvesting begins about 8-12 weeks after sowing. Typically, first sowings can be harvested from late May, with peak yields in June.
Pods should be harvested young and tender: they taste best when seeds inside have just started to swell but are not fully developed (pods are still flat or only slightly rounded).
If left too long on the plant, pods thicken, seeds harden, and the inner papery layer develops, losing the tender sweetness and crunch that make Mangetout so desirable.
Therefore, harvest daily or every two days at peak season, as new ripe pods appear frequently. The best time to pick is in the cool morning when pods are full and crisp. Hold the plant with one hand and snap the pod off with the other to avoid damaging stems.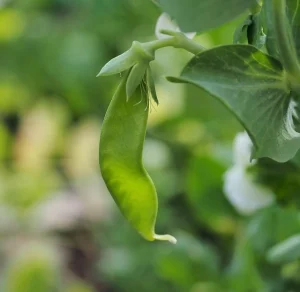
Remove any damaged or diseased pods. The season ends when the plant stops flowering and leaves yellow—harvest the last small pods then.
After harvesting, remove or cut back plant debris. Many recommend leaving roots to rot in the soil (as they contain fixed nitrogen)—I agree and usually cut stems at ground level and leave roots in place.
Consume or refrigerate harvested Mangetout immediately, as sugar content declines rapidly at room temperature, reducing sweetness. Fresh Mangetout keeps in the fridge for up to 4-5 days without quality loss. Store pods in perforated plastic bags or wrapped in damp kitchen towels/paper towels in the fridge’s vegetable drawer to slow wilting.
For larger quantities, freezing is an excellent preservation method. Wash fresh, tender pods and trim ends (remove any fibrous strings). Blanch briefly by plunging pods into boiling water for 3-5 minutes, then cool immediately in ice water or very cold running water to retain bright green colour. Drain well and pack in freezer bags with minimal air.
Frozen Mangetout can be stored for 12-18 months without quality loss. No need to thaw before cooking—add directly to boiling water or frying pan to keep crispness.
(Note: Mangetout can also be preserved in jars with salt brine like canned peas, but since the pod is included, freezing better preserves texture and flavour.)
Mangetout is versatile in the kitchen, with tender pods that are delicious raw or cooked. Here are some ideas:
Fresh and raw: Young Mangetout pods can be eaten raw as a crunchy snack. Chop and add to salads or serve on vegetable platters with dips. Their sweet, fresh flavour and crisp texture make them popular with children as a healthy nibble.
Steamed or as a side dish: Briefly steam or boil Mangetout in salted water for a tasty side. Sauté in butter with fresh parsley and garlic for a delicious accompaniment to roast meats or fish. Avoid overcooking—just until bright green and slightly crisp (3-5 minutes steaming or boiling).
In stir-fries and woks: Mangetout is a favourite in Asian cuisine. It cooks quickly in a wok, retaining crunch and sweetness, and pairs well with other vegetables and proteins.
| Aspect | Ideal Conditions | Common Issues | Tips |
|---|---|---|---|
| Soil | Loamy, well-drained, humus-rich, neutral to slightly alkaline | Heavy clay or sandy soils need improvement | Incorporate compost; avoid fresh manure |
| Sowing Time | Late Feb to March (early spring) | Late sowing reduces yield | Succession sowing every 2-3 weeks |
| Watering | Moderate; keep soil moist during germination and flowering | Overwatering causes root rot; drought reduces pods | Water early morning; mulch to retain moisture |
| Support | Stakes or netting for tall varieties | Trailing stems prone to disease without support | Install supports when plants are 5-10 cm tall |
| Pests & Diseases | Good airflow, crop rotation, companion planting | Aphids, pea weevil, powdery mildew, downy mildew | Regular monitoring; organic sprays; remove infected plants |